Hello Everyone,
This post will explain about how to integrate Azure AD premium with on-premises AD and use the concept for single identity for both cloud and on-premises resources.
For integration process, we require Azure AD Connect tool.
Let's start with prerequisites and practical steps... :)


For MX Record:

For CNAME Records:


Click on Sign-in to GoDaddy:

After Sign-in, Click Next:
Login to GoDaddy with Your credentials:

Click Accept:

Click Next:

Select All users and Click Update Selected Users:
 :
:
Click Next:

Sign-out and Sign-in Again:

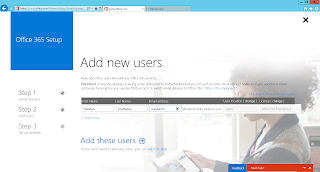
Add new user if You want:
Click Next:

Now here is the option where Office 365 will add DNS records if You didn't added manually:
 Click Next:
 Click Next:
 Click Add records:

Click Okay, I''ve added the records:

Click Finish:

Now if You see, Your added domain is verified:
Office 365 Portal:

Azure Portal:

This is all about configuring Azure AD Premium for integration between on-premises AD and Azure AD.
My next posts (separate new posts) will be about:
Thanks All for reading!!!
If You like my blogs then follow me for updates:
http://mdtechskillssolutions.com/
Join my Facebook group for updates on trending technologies/technical references/issues etc:
https://www.facebook.com/groups/technicalskillsenhancementworld/
This post will explain about how to integrate Azure AD premium with on-premises AD and use the concept for single identity for both cloud and on-premises resources.
For integration process, we require Azure AD Connect tool.
Let's start with prerequisites and practical steps... :)
Prerequisites:
Azure AD Prerequisites:
- Azure subscription: Paid or trial. You can also use paid office 365 portal (If using this then Azure subscription is not required).
- Add and verify on-premises domain to Azure portal.
- By default, Azure AD allow 50K objects and after added on-premises AD, it allow upto 300K objects but If You want more objects then You have to open ticket for the same. If still You need more than 500K objects the You have to purchase licence.
On-Premises Prerequisites:
- AD schema and forest functional level must be Windows Server 2003 or Later.
- For password write-back feature, DC must be on Windows Server 2008 with latest SP or later.
- Azure AD Connect must be install on Windows Server 2008 or later (Standard or better edition, not essential or small business edition). For password synchronization, minimum version must be windows server 2008 r2 sp1 or later.
- Azure AD Connect server must have .Net 4.5.1 or later and Power-shell 3.0 or later. These features are available on Windows Server 2012 R2 by default.
- If ADFS is deployed then the server must be Windows server 2012 r2 or later and Windows Remote Management must be enabled. Also, SSL certificate will be required.
- Azure AD Connect requires a SQL Database to store identity object. It support all SQL Server from 2008 (with SP4) to Sql 2014.
Accounts Prerequisites:
- Azure AD Global Administrator account
- An Enterprise administrator account of on-premises AD.
- Test User account (minimum 2) to test synchronization.
Azure AD Connect Tool Prerequisites:
- This requires .Net 4.5.1 or later version and Powershell 3.0 or later.
- For Windows Server 2012 R2: Powershell is installed by default. For .Net 4.5.1, You can either download or choose from windows updates.
- For Windows 2008/2008 R2/2012: You have to download and install both from Microsoft Download Center.
Windows Remote Management:
- If using ADFS in your environment, then You have to enable Windows Remote Management. Use powershell script in elevated mode: Enable-PSRemoting -force.
SSL Certificate Required:
- For all ADFS farm, You have to use SSL certificate.
- Certificate must be X509.
- Identity of Certificate must match with federation service name.
- Certificate must be CSP based (Cryptographic Service Provider), not KSP (Key Storage Provider).
- You can use Wild card certificates also.
Hardware Requirements for Azure AD Connect:
For up-to 100,000 Objects, SQL server basic express installation can be used and below are the requirements:

For more than 100,000 objects, full version of SQL server is required and below are the requirements:

After completing all required prerequisites as per your environment, let start with Integration of Azure AD and on-Premises AD:
Scenario in my Lab (Used Windows Server 2012 R2):
- 1 Domain Controller
- 1 Physical Server with Internet Connectivity.
- Azure Subscription.
- 1 Domain purchased.
NOTE: Internet is not required on Domain Controller machine. You can install "AzureADConnect" tool on other server with internet connectivity with only condition that server must communicate with Domain Controller.
Integration between Azure AD and On-Premises AD:
Add on-premises domain to Azure Portal:
Open the Azure portal with Azure Global Administrator Account:

Click on Your Active Directory and then Click on Add Domain:

Give Your on-premises Domain Name, Select the check box and Click on Add Button:

You will see message for successfully added domain, Click next:

After that, Click on Tick mark to complete configuration:

Now, You will be redirected to Directory Integration Page:

Download, Install and Configure Azure AD Connect Tool:
As You see, Directory Sync is not activated, Now, Download, Install and Configure Azure AD Connect tool.
You can download Azure AD Connect Tool from below Link:
After download, Start installation:

Select option as per your need:

Provide Azure Credentials:

Provide on-premises Domain credentials:

Click Install:

After Configuration done, Click on Exit:

After installation, You can see Directory Sync is enabled:

Users are synchronised:

Tested Login with on-premises account to office 365 portal:

But Still added domain is not verified:

If You click on Start setup then it will ask You to use powershell commands to verify it as You have configured it for single-sign on feature.
Verify on-premises domain to Azure Portal:
Now, Verify added Domain on Azure Portal. On this step, I have noticed that many users had trouble how to verify our domain. To verify Domain for Single sign on, You must know Your Domain registrar like GoDaddy etc for creating required DNS records.
Office 365 provide instruction on how to register DNS records on some common domain registrar:
If You don't know Your registrar then no need to worry about, There is also option to know Your Domain registrar. For this, open below link, type Your Domain and click on submit. You will get complete details about Your domain registrar.
Now, To verify domain, You need to go to office 365 portal. But there are two options for You to create DNS Records in Your Domain registrar:
- Manually by entering each required DNS records.
- Let Office 365 allow to do this for You.
I will show You both options, You can use any one as per Your wish ... :)
Let's start with creating DNS records manually on Domain Registrar.
My Domain registrar is GoDaddy.com so I will open it and login with my ID. After login, I will go to My Accounts, select Domain and Click on Manage DNS:

Click on DNS Zone File and then Click on Add Records:

Now, Below are the DNS records You have to create with respective Values:
NOTE: TXT Value is the destination value which can be checked by running below Powershell script:
Get-MsolDomainVerificationDNS –domainName contoso.co.uk –mode DnsTextRecord
This above powershell will only run in Azure AD Powershell module so You have to first download and install below two files on the server where You will install AzureADConnect Tool:
https://www.microsoft.com/en-us/download/details.aspx?id=41950 (First install this)
After above tools installation, You will see Azure AD Powershell shortcut on your desktop. Open it and run above script to see Your TXT Value for Your destination.
Now, Back to Domain registrar page to see how to add DNS record:

Click Finish. Now, You have to click on Save Changes to update added DNS records over internet:

Now, You can your added record:
Below are the Lists of DNS records You have to create as per above steps:
For MX Record:

NOTE: You will see 2 additional MX records other than this one by default, so delete both MX records.
For CNAME Records:

For TXT Record for SPF to prevent email spam:
For SRV Records:
After adding all DNS Records, don't forget to Save them.
Now, above was the process to add DNS records manually.
Let's start with verifying added on-premises domain on Office 365 Portal and their I will show You the option where Office 365 ask to add DNS record itself.
Open office 365 portal, Click on Setup tab and then click on Start setup now:

Click on Let's get started:

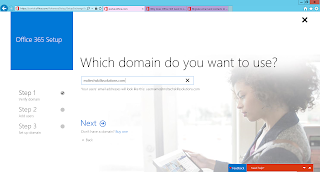
Type Your domain name and Click Next:


After Sign-in, Click Next:


Click Accept:


Click Next:


Click Next:

Now here is the option where Office 365 will add DNS records if You didn't added manually:


Now if You see, Your added domain is verified:
Office 365 Portal:


Reference URLs:
- https://azure.microsoft.com/en-gb/documentation/articles/active-directory-aadconnect-prerequisites/
- https://azure.microsoft.com/en-gb/documentation/articles/active-directory-add-domain/#edit-dns-records-for-your-cloud-services
- https://azure.microsoft.com/en-gb/documentation/articles/active-directory-aadconnect/
- https://msdn.microsoft.com/library/azure/dn919677.aspx (For Powershell scripts)
This is all about configuring Azure AD Premium for integration between on-premises AD and Azure AD.
My next posts (separate new posts) will be about:
- Some more features of Azure AD connect.
- Microsoft Intune including almost all functionalities.
Thanks All for reading!!!
If You like my blogs then follow me for updates:
http://mdtechskillssolutions.com/
Join my Facebook group for updates on trending technologies/technical references/issues etc:
https://www.facebook.com/groups/technicalskillsenhancementworld/

I have found that this site is very informative, interesting and very well written. keep up the nice high quality writing Designing and Implementing a Data Science Solution on Azure course DP-100
ReplyDeleteGreat bblog I enjoyed reading
ReplyDelete