Hello Everyone,
In this blog, I will share:

VM Deployment is simple but still many of freshers don't know how to work on hyper-v and create Virtual machines so I am just adding few screens to create VMs.
Open Hyper-V Console, Click on New in Action pane on right hand side & then click on Virtual machine:

Some of the changes has been done in VM Settings so I will show mostly in the post and some of changes I will show in individual feature's post.
So let's start with one by one....
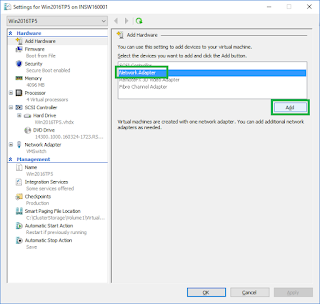
Now You can add or remove network adapter while VM is running:
Supported on below case only:

Example:
Suppose You have assigned dynamic memory for any VM with below details:


Supported for Linux VM with generation 2 only & if running on Windows Server 2016 TP or above versions only. Below are the supported versions details:

This feature is added now separately in 2016 version. In earlier version, You need to add VHD and in advance features, need to enable disk as shared drive. Now that option is removed and added as separated where You can create and add shared drive separately in VM. Shared drive extension will be .vhds and You can resize the shared drive online. Another good feature of 2012:

There are many features which I will explain in new posts separately in details.
Share Your feedback or any query!!!
In this blog, I will share:
- Prerequisites for Hyper-V installation
- Hyper-V Installation
- VM Deployment
- What's new in VM Settings available as compared to Hyper-V 2012 R2
To see Windows Server 2016 Technical Preview 5 Overview, Click Here!
Let's start with prerequisites...
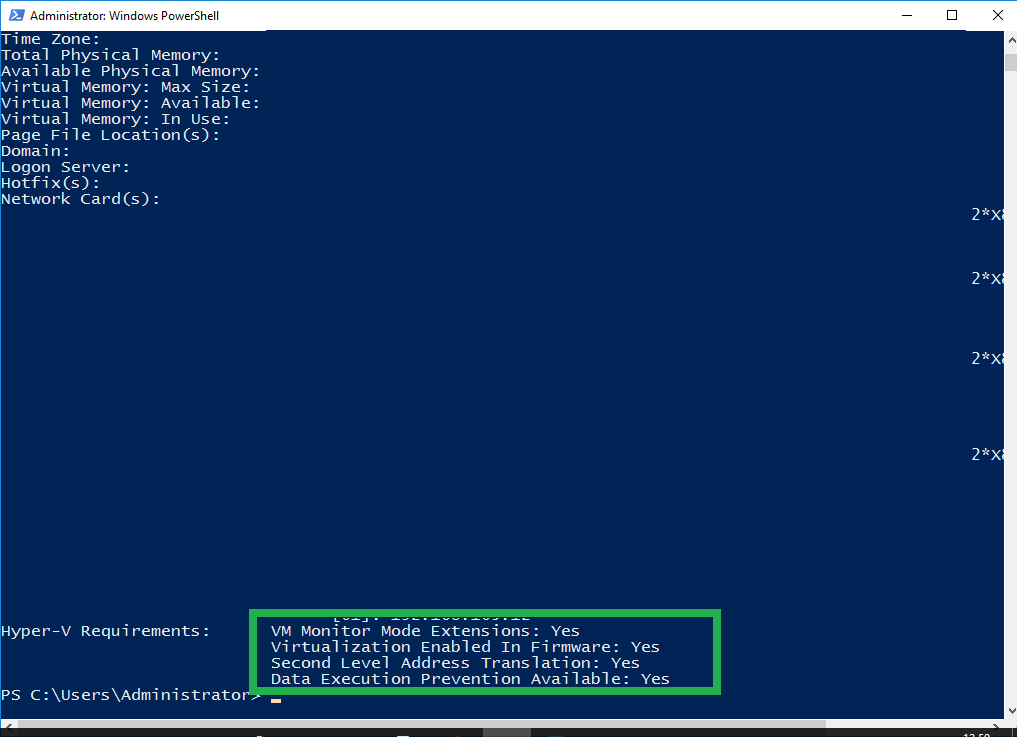
Hyper-V 2016 TP5 - Prerequisites:
Hyper-V 2015 TP5 has below prerequisites which must be checked before proceeding:
- 64-Bit Processor with SLAT (Second Level address translation)
- VM Monitor Mode Extensions
- Enough Memory - min 4 GB
- Virtualization Support turned on in BIOS or UEFI:
- Hardware-assisted virtualisation: This is available in processors that include a virtualisation option - specifically processors with Intel Virtualization Technology (Intel VT) or AMD Virtualization (AMD-V) technology.
- Hardware-enforced Data Execution Prevention (DEP) must be available & enabled. For Intel systems, this is the XD Bit (execute disable bit) & For AMD systems, this is the NX Bit (No execute bit).
What is SLAT?
Second
Level Address translation, also known as Rapid Virtualization Indexing (RVI),
is a feature of CPU. Intel named it as Extended Page tables (EPT) & AMD named
it as Nested page tables (NPT).
How to check if CPU support SLAT & Virtualisation/DEP/SLAT is enabled or not:
Open power-shell console, type: systeminfo and click Enter:
Hyper-V 2016 TP5 Installation:
Installation process is similar to earlier versions but some additional roles & features added with new version.
Open Server manager, Click on Add Roles & Features:

Open Server manager, Click on Add Roles & Features:

Click Next, Next, Next & Then Select Hyper-V Role:


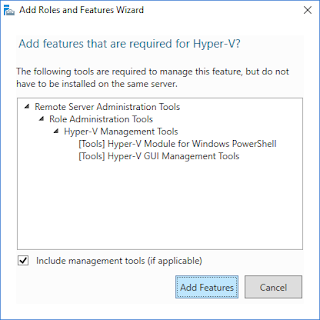
Click on Add Features:

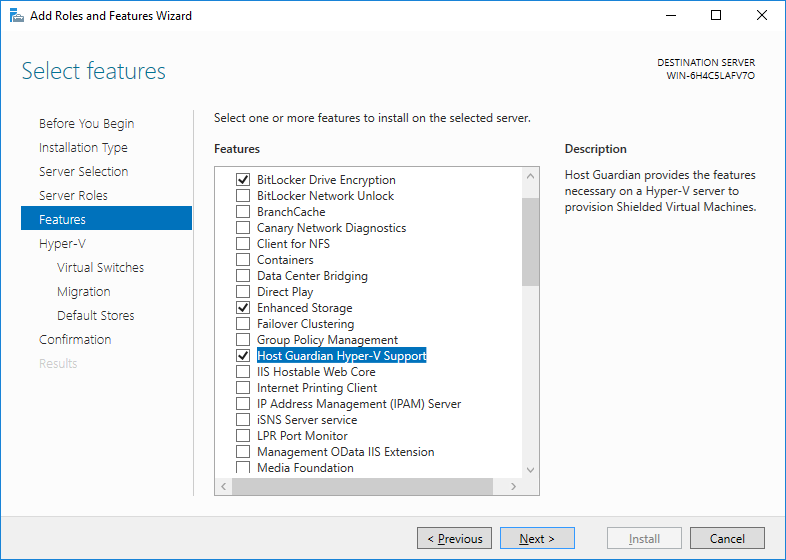
Select Host Guardian Hyper-V Support Feature for shielded virtual machine:

Click on Add Features:


Click Next till last and then Click Install (Reboot will be require):


Hyper-V Installation completed:


VM Deployment:
VM Deployment is simple but still many of freshers don't know how to work on hyper-v and create Virtual machines so I am just adding few screens to create VMs.
Open Hyper-V Console, Click on New in Action pane on right hand side & then click on Virtual machine:

Click Next, Give Name and path for new VM:


Select Generation and Click Next:


Select memory (Select Dynamic Memory if You want):


Configure network (Already explained in previous version post. To see complete list, Click Here!) & Click Next:

Give Size of disk and Click next:


Give Size of disk and Click next:

Select installation media and Click Next:


Click Finish:


Now, Start the VM and proceed to install the OS, Once done the VM is ready to work:


What is new in VM Settings?
Some of the changes has been done in VM Settings so I will show mostly in the post and some of changes I will show in individual feature's post.
So let's start with one by one....
Add Network Adapter online:

HOT Add/Remove for Dynamic Memory:
Supported on below case only:
- Can only increase max memory assigned or decrease min memory assigned while VM is running but not possible vice versa:

Example:
Suppose You have assigned dynamic memory for any VM with below details:
- Startup Memory - 2048 MB (By default, In 2016, it is 1024 MB. In older version, it is 512 MB)
- Min Memory - 2048 MB
- Max Memory - 4096 MB
So, When VM is running, as per above assigned memory, You can:
- Reduce Min Memory between 512 to 2048 but cannot increase it more then 2048.
- Increase Max memory from 4096 to max limit but cannot reduce it below 4096.
Remove Compact from Edit Disk option in Win 2016 Server:
In 2016: Only Expand option is available when VM is running.

In 2012 R2 or older version:

Added Device Naming in Network Adapter Advance Features:

CheckPoint Types (New):
Production checkpoints are "point-in-time" images of a virtual machine. These give you a way to apply a checkpoint that complies with support policies when a virtual machine runs a production workload. Production checkpoints are based on backup technology inside the guest instead of a saved state. For Windows virtual machines, the Volume Snapshot Service (VSS) is used. For Linux virtual machines, the file system buffers are flushed to create a checkpoint that's consistent with the file system. If you'd rather use checkpoints based on saved states, choose standard checkpoints instead.

Secure Boot is added (New):
Supported for Linux VM with generation 2 only & if running on Windows Server 2016 TP or above versions only. Below are the supported versions details:
- Ubuntu 14.04 or Later.
- SUSE Linux Enterprise Server 12 or Later
- RedHat Enterprise Linux 7.0 or Later.
- CentOS 7.0 or Later

Add Shared Drive Online (New):
This feature is added now separately in 2016 version. In earlier version, You need to add VHD and in advance features, need to enable disk as shared drive. Now that option is removed and added as separated where You can create and add shared drive separately in VM. Shared drive extension will be .vhds and You can resize the shared drive online. Another good feature of 2012:

There are many features which I will explain in new posts separately in details.
Share Your feedback or any query!!!
Happy Reading!!!
If You like my post then follow my updates:
Join my Facebook group for updates on trending technologies/technical references/issues etc:

D36FF0EA5B
ReplyDeletekiralık hacker
hacker arıyorum
belek
kadriye
serik
8EF1D37ECF
ReplyDeleteTakipçi Satın Al
En İyi Kore Dizileri
Nikah Şekeri